As engineers, we've all built AI Agents that work perfectly for test queries on our local machines, but how do we verify that an agent is reliable enough for production? How do we confidently pitch agentic projects to stakeholders and say, "Yes, this system will be trustworthy and reliable for our customers"?
This is the Trust Gap of AI Agents. We cannot simply ship an agent and hope for the best. Unlike traditional software, where a single test case yields consistent outcomes, Large Language Models (LLMs) are non-deterministic - the same input can yield different results. Without a systematic way to measure and prove reliability, getting the internal "green light" is impossible, and furthermore, we risk destroying customer trust with a product that fails unpredictably.
To bridge this gap, we need to replace "vibe-based" checks with quantitative evaluations. This requires a shift from the traditional Software Development Lifecycle (SDLC) to the Agent Development Lifecycle (ADLC).
In this technical deep dive, we'll look at the heart of the ADLC, an iterative process that turns a functionally complete pilot into a reliable production-grade system: the Agent Development Flywheel.
The Prerequisite You Can't Skip: Observability and Defining Success
Before we can start to cycle through the flywheel, we need to establish our technical foundations for the agentic system. We need to see what the agent is doing (Observability) and we also need to know what “good” actually looks like for the agentic system (KPIs).
Throughout this blog post, we’ll use a data analyst agent that takes in a text user input and calls tools like textToSqlTool and executeSqlTool to convert text prompts into SQL queries and executes them.
Full-Trace Observability
In traditional software, we might get away with basic logging. However, AI Agents are more complex systems as they involve a range of tools, vector stores, LLMs, and such. If we cannot see exactly what the model is thinking and doing, we’re flying blind.

Tracing allows us to see every single decision the agent makes behind the scenes, including:
- Every tool call and its arguments.
- Every context retrieval (RAG) from your vector database.
- Every input and output from LLMs.
Once we have tracing set up, we need to set up our success criteria for our agentic system.
Defining Success (KPIs)
We cannot optimize an agentic system to make it better when we haven’t defined a success criteria. Before entering the flywheel, it is critical to align with all stakeholders on KPIs that define success of the agentic system.
These KPIs will dictate our evaluation strategy. For instance, if our KPI for the data analyst agent is “reliable financial data analysis”, then we must map it to a valid evals: Did the agent generate accurate and executable SQL queries? Did it query the correct columns or tables?
Pro Tips for Defining Success:
- Map Evals to KPIs: Don't measure everything, measure only the evals that are tied directly to your KPIs or success definition for the agentic system. For example, if the priority is data accuracy, focus the eval suite on the SQL generation step rather than the chat personality. This helps avoid noise later on.
- Define Risk Tolerance: Perfection is impossible with non-deterministic systems. Agree on a threshold (e.g., "95% accuracy on textToSQL tool") before building to create a clear bar for shipping.
The Agent Development Flywheel in Practice
The flywheel consists of 4 steps.
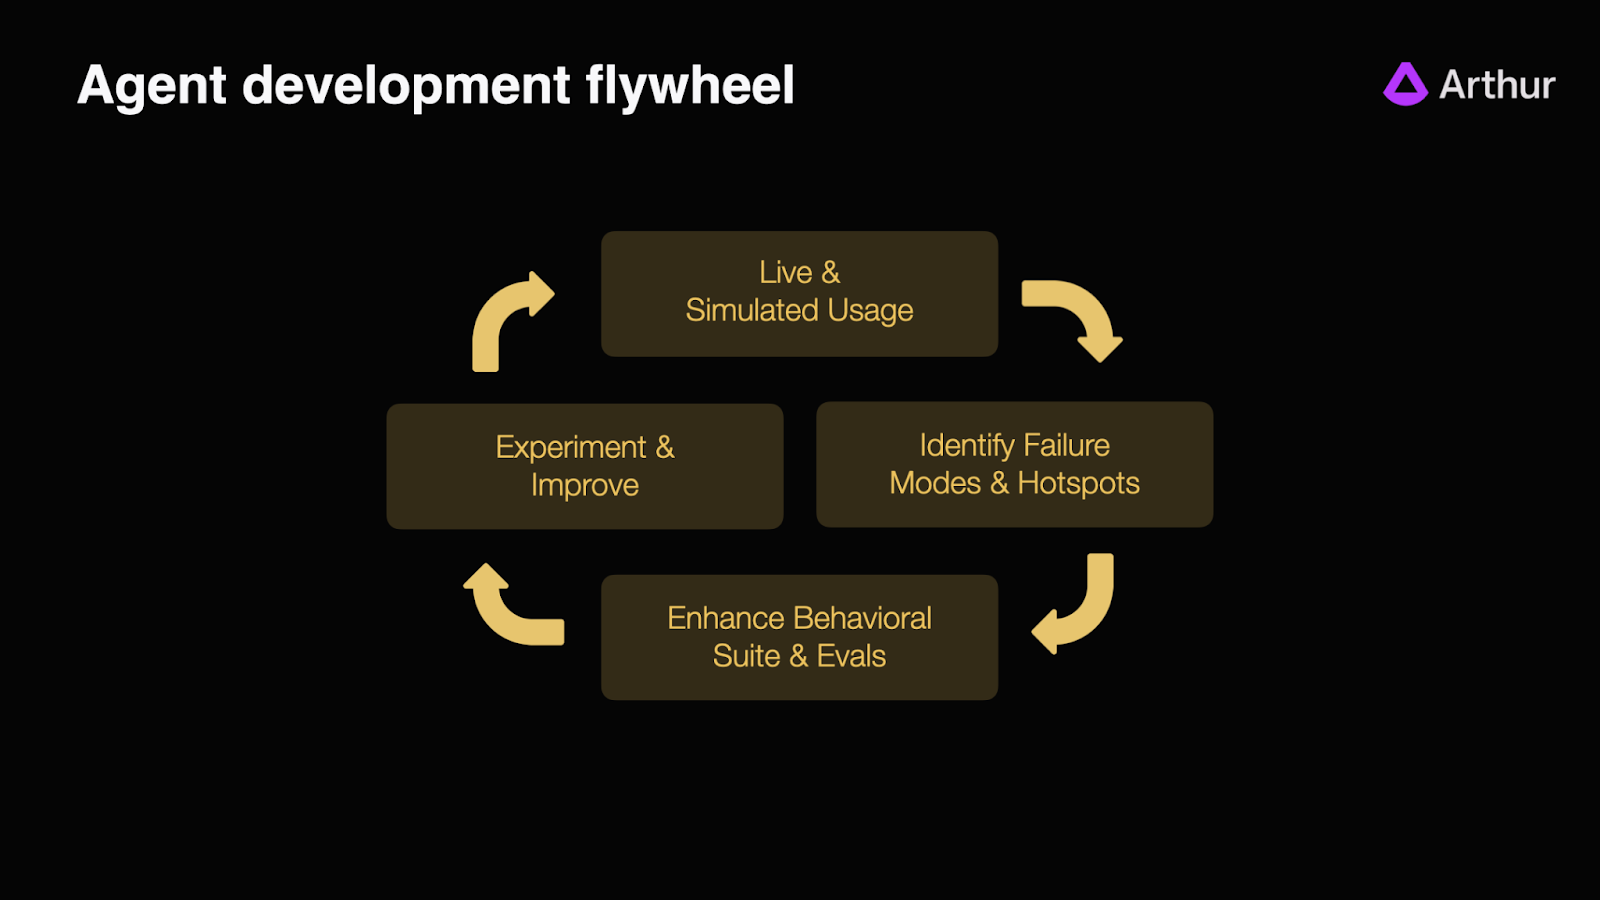
Step 1: Collect a Baseline Testset (Live & Simulated Usage)
The first step is to create a baseline testset to initially evaluate our agents.
Start with developer usage or data collected by interacting with the prototype. The best way to do this is to go through the agent traces and add the “good” test cases directly into the baseline testset. From there, we expand to controlled pilot customers or internal teams to capture real-world variance.
For instance, in this case, we're curating a baseline test set of "good" examples by directly adding traces from our data analyst agent.
Pro Tips for building test sets:
- Keep it Small: Don't try to build a large test suite immediately. It is often better to start with a highly curated set of under 200 rows. This size allows us to manually review results and understand why failures are happening, rather than getting lost in noise .
- Start with "Golden" Testsets: We generally recommend starting with "Golden Testsets" of good examples (behaviors the agent must emulate) rather than maintaining sets of "bad" examples (behaviors the agent must avoid). There are infinite ways an agent can fail, so testing against specific bad outcomes is often futile.
- Simulate Traffic: If we lack initial traffic, we can simulate it. A useful technique is to build a secondary agent specifically designed to interact with our target agent, generating a high volume of simulated user traffic to stress-test edge cases before a human ever sees them.
Step 2: Find the "Hotspots" (Identify Failure Modes)
Once we have usage data, we must move from vibe checking to systematic measurement. This relies heavily on the observability we set up in the previous step.
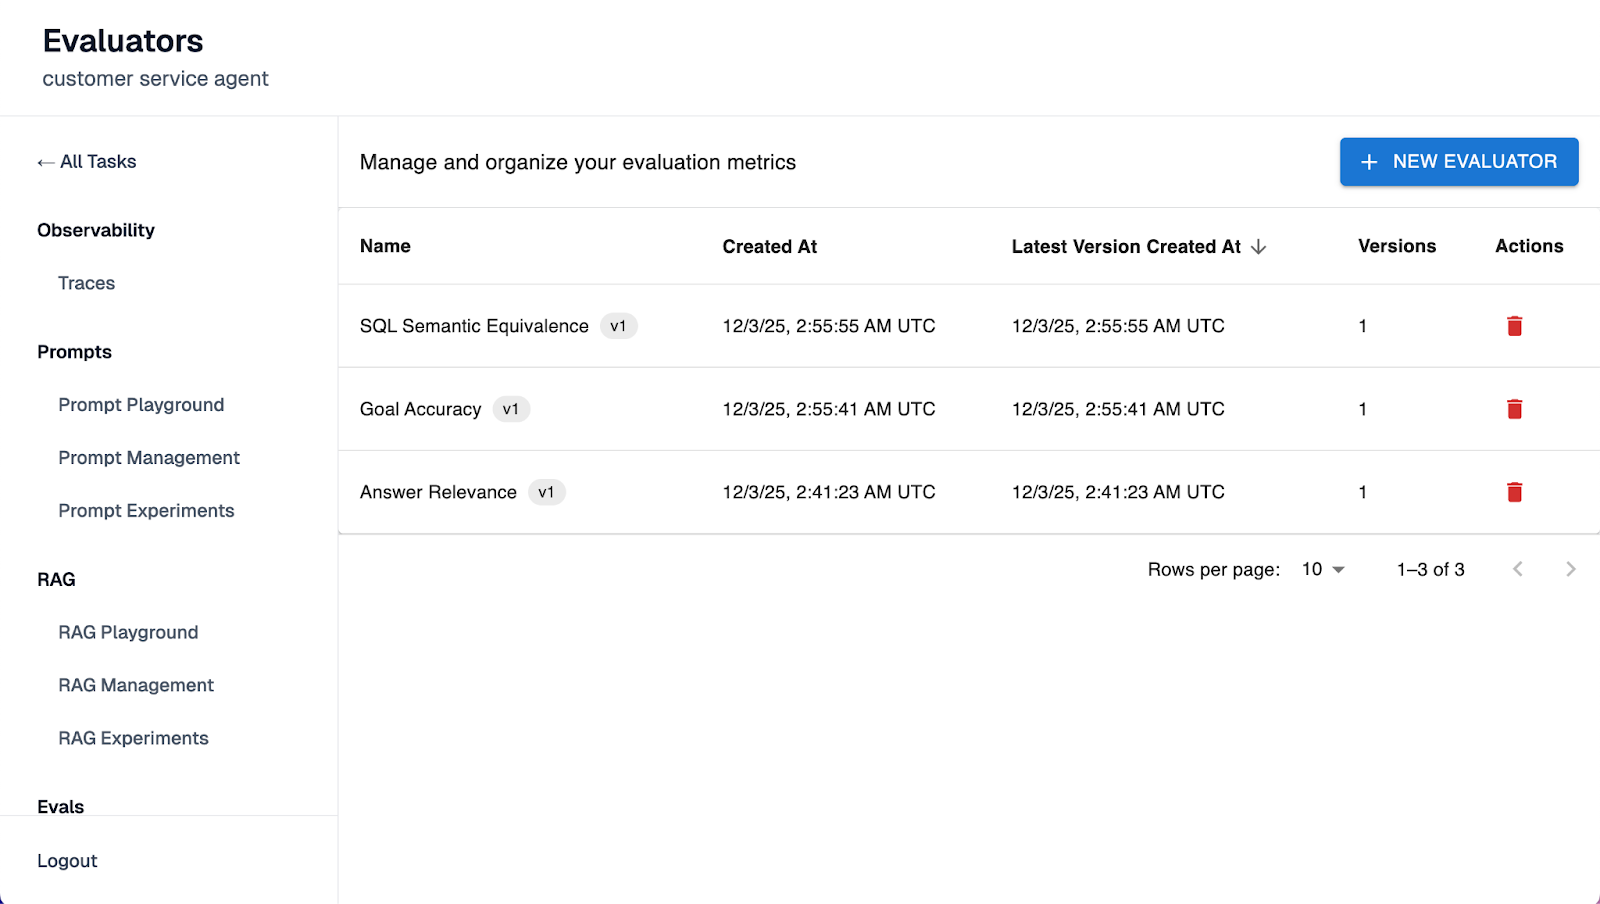
We need numeric scores to identify specific hotspots in our agent’s architecture. For example, if we are building a data analyst agent, we might find that while our tool selection is 99% accurate, the specific SQL generation is failing 50% of the time. We get these numeric scores by running test runs against our baseline testset that we created in step 1 and looking at which evals in the agentic system are failing. Tools like Arthur help you setup these initial evals and test runs.
This numeric clarity transforms a vague problem ("the agent feels buggy") into an actionable engineering task ("we need to fix the Text-to-SQL generation step").
Step 3: Build Your Safety Net (Enhance Behavioral Suite & Evals)
When we find a failure in Step 2, instead of just tuning the agent to fix the single hotspot, we manually update our evaluation test sets with those specific failure scenarios. This ensures that the error never silently reappears in the future.
Step 4: Fix What's Broken (Experiment & Improve)
With our hotspots identified and our test suite updated, we can now create experiments to understand if our updates to any part of the agent are causing performance regressions or improvements.
For instance, to fix that 50% SQL accuracy, we might try prompt tuning, swapping the underlying model, or adding few-shot examples to the context.
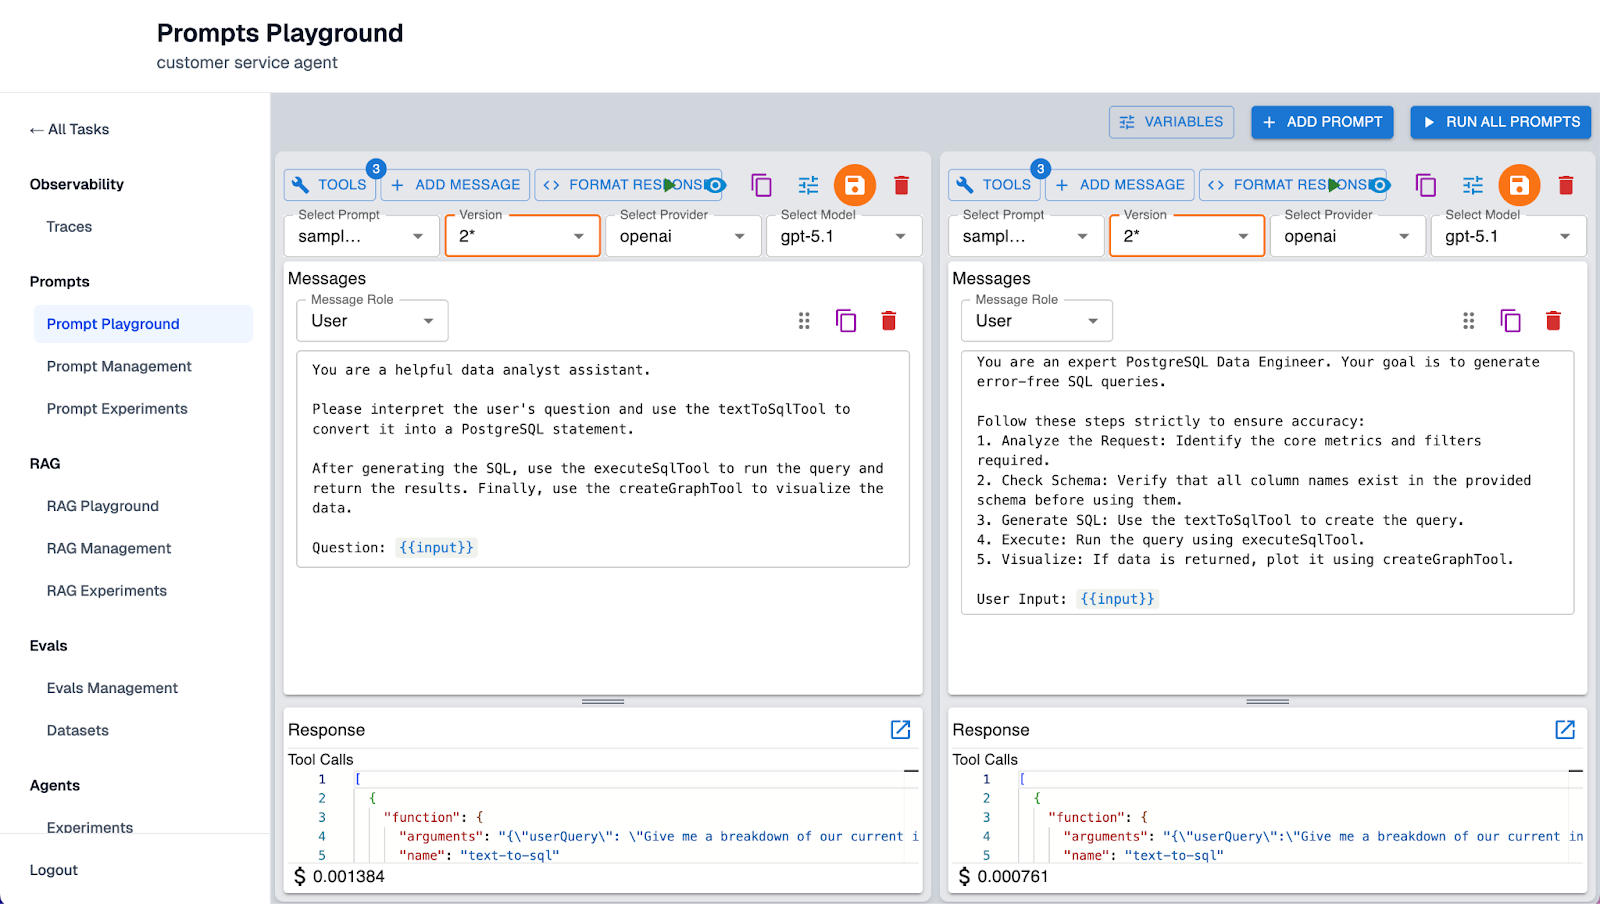
Using Arthur's prompt notebooks, we can run experiments, refine prompts, and evaluate the resulting improvements, as shown in the screenshot above.
Then run this update as an experiment against our entire evaluation suite. This confirms two things:
- Improvement: Did the experiment actually fix the SQL generation issue?
- No Regressions: Did this fix accidentally break the tool selection logic that was working perfectly before? For instance, does the agent now try to force use of the textToSQL tool for simple greetings like "Hello"? Or has the new prompt caused it to hallucinate table names that do not exist?
Once we confirm the improvement without regressions, we ship the update. The flywheel doesn’t stop after one cycle, it’s meant to be continuous. As we keep getting more live user data, we continue to identify hotspots and update our test sets so as to improve the agent eventually.
Best Practices: Strategies for Building "Good" Evals
The flywheel is only as effective as the evaluations powering it. If our evals are noisy or vague, the optimization cycle will stall. Based on our vast experience helping companies ship reliable agents, here are three best practices for designing an evaluation suite that actually drives reliability.
Commit to Binary Decisions (Pass/Fail)
A common mistake teams make is designing evals that output a score on a 0-10 scale (e.g., "This response is a 7/10 on toxicity"). While this feels nuanced, it actually creates a problem: it pushes the decision-making burden upstream. A human still has to decide if a "7" is acceptable or not.
Instead, reliable evals should be binary: Pass or Fail. We must bake the logic of what constitutes "good" or "bad" directly into the evaluation itself. If the agent's output crosses the line, the eval should simply fail. This clarity allows teams to automate testing and instantly identify regressions without ambiguous interpretation.
Avoid "Signal Fatigue"
When starting, there is a temptation to track everything. However, having hundreds of failing evals creates noise rather than signal. A good rule of thumb here is if an alert fires and no one acts on it, it isn't an important metric - it is just a distraction.
Teams should focus on the most critical KPIs first that are tied to business outcomes. Once the agent is reliably passing those critical KPIs, we can layer in additional complexity. The goal is to eventually have a dashboard where evals in red demand immediate attention.
From Guesswork to Reliable Agents
Ultimately, the Agent Development Flywheel is more than just an engineering process. It’s a communication tool that allows us to prove the reliability of agentic systems to all stakeholders.
Business leaders cannot give teams a green light based on a vague promise that the agent "feels better" today than it did yesterday. Instead, the flywheel shifts the conversation from "Is this perfect?" (which is likely impossible for non-deterministic systems) to "Does this meet our agreed-upon threshold and meet the KPIs?".
If you're interested in learning about how other companies are implementing the ADLC, check out our case study with Upsolve.
If you're a venture-backed startup building AI Agents and interested in working with Arthur to ship reliable AI agents to production, apply for Arthur's startup partner program. This program offers early access to Arthur's agentic tools, dedicated support, and resources to launch your AI safely in production.
SHARE


